Tuesday 26 June 2012

Quinoa Vegan Shepards Pie

What could possibly be better than a heart warming bowl of vegan shepards pie on a chhilly rainy day?
This recipes takes no time at all, close to NO dishes, and warms the body and soul. Above all that its perfect to freeze and save for a quick dinner.

Heat up about 2 tbsp of olive oil in a pan. Throw in 1/2 cup of red onions and about 3 chopped ripe tomatoes. Allow to simmer for a good 10 minutes on medium heat. Turn heat off.

Add 1/4 cup of nutritional yeast (this is optional but gives a great cheesy flavor).

Throw all of this saucy mixture into any sort of blender you have at home. Of course vitamix is best but  we just have our magical little bullet at home which works just fine. Before you blend all this up add a splash of milk (any alternative you have, nothing too sweet though) 4 pitted dates and about a handful of almonds. And no you didn't read that wrong, those dates will add the perfect amount of sweetness to your delicious sauce. Blend all this up for about 3 mins or so.

It should look close to this beeaauutiful color orange.


From here chop about 1 cup of kale and broccoli. Don't over think your cooking, add ingredients using your common sense and intuition. If you would like more or less of anything then do it! These are just guidelines. Add your veg and sauce back into the pot and simply mix together. 


And now we put it all together! Most of the time I have a container of cooked quinoa in my fridge and this may be a great habit for yourself to get into as well. It's a wonderful thing to add to salads or into last minute recipes like this. 


+ quinoa


+ your divine sauce and veggies


+ top that baby off with some mashed sweet potatoes (add tad bit of vegan butter if you'd like)

Voila!

I wrapped both of these beauties up, one for Tays dinner tonight and one will be waiting in the freezer for another time. Bake in the oven at 350 untill the top looks cooked and a bit crispy. We will have to wait and see what Taylor's review is.

Remember to enjoy these rainy days because they bring us beautiful green grass tomorrow! Much love to all you sexy cooks out there, stay true and healthy. Taegan.


Monday 25 June 2012

Beauty and Lifestyle Tips and Tricks!

Here are some random beauty/lifestyle tips and tricks that I've learned to be super helpful!

  1. Squeeze lemon juice over your apples to stop them from browning
  2. Lemon juice is also great for fixing any self tanner mishaps! Squeeze some of the lemon directly on an uneven spot or blotchiness and it will wipe it right off! Hurray for that!
  3. If your going out for coffee try to always bring your mug; not only is this environmentally friendly, but you will 9 times out of 10 get more bang for your buck since they will usually fill your mug, no matter what size you pay for :) be friendly and shoot your barista a smile too! Always works!
  4. Like I mentioned in my last beauty post: tinted moisturizer is GREAT for the summer for a lighter foundation coverage. But, remember to wipe the foundation from your eyebrows after you apply it, otherwise foundation will clog up there and will be very noticeable on your face. A washcloth or toilet paper will do just fine!
  5. Side note to that last tip, try to always put on your makeup in natural sunlight. Putting it on in a closed room with artificial lighting will cause you to unevenly apply your foundation and concealer (believe me) and can also cause you to put on the wrong shades, so makeup will be overly noticeable on your face. No thank you.
  6. Always pluck your eyebrows in the evening - this allows the redness to fade by morning, and also the skin is less sensitive than say the morning when they are all puffy. 
  7. For the same reason above, don't get any waxing 'down there' close to your time of the month! It is especially sensitive at this time and you will feel it. Well, you always will but you will MORE. Again, no thank you.
  8. Try to always shave your legs at night! Your limbs swell overnight, so you won't get a close enough shave if you do in the morning.
  9. Last one I can think of here:


Hang your jewellery from pins in a bulletin board if you have one! Makes for great, cheap and easy jewellery storage.

That is all! I'll try to pick my brain for more points in the future.

Hope you find them helpful!


Friday 22 June 2012

New and Hot Spots in Calgary

Recently we visited a couple new restaurants in Calgary, both of which were amazing, unique, and within walking distance on 17th ave.

The first was Cibo- which means food in Italian. I suggest going anytime before 7 pm because this place can get packed, and for good reason! Generous portions, unique wine selection, and the food is truly phenomenal. Try it for yourself!


Note: the chandelier in the back made out of branches! So neat!


The next was National. We only came here for drinks but I have heard the east coast oysters are very good. Fun atmosphere (long picnic tables, much like Wurst), interesting menu, and great caesars!


Taylor and I split this big guy. The Caesar is made with horseradish, and comes with shrimp and a celery stick the size of your head!

A regular at Javino Coffee and Wine bar in Discovery Ridge told me about this gem of a restaurant I must try. The menu looks healthy and seems to have the highest quality ingredients. So a review for The Main Dish (http://www.tmdish.com/) will be coming very soon!


Also a side note: if you live in SW Calgary and are looking for some gluten free baking, Javino is now carrying these delicious treats. A woman from Canmore creates these little beauties and I must say, they are truly amazing.


 I tried the Superfood energy bite before an intense hot yoga class and it was just what I needed. A bit crunchy, not too sweet, not too filling and a great little energy boost.

If you know of any new and hot places in Calgary, let us know! 

The Power of Chakras

It is said that our body contains hundred of chakras that are the key to the operation of our being. These “spinning wheels” draw-in coded information from our surroundings. Coded information can be anything from a color vibration to ultra-violet ray to a radio or micro wave to another person’s aura. In essence our chakras receive the health of our environment, including the people we are in contact with (which is why other people’s mood have an affect on us!). Our chakras also radiate an energy of vibration.

It is believed that we have seven main chakra centers and each main center is connected to our being on several different levels: physical, emotional, mental and spiritual. On the physical level each chakra governs a main organ or gland, which is then connected to other body parts that resonate the same frequency.

There is so much information on the chakra systems and how they work, so I believe it is most important to find what works for you, what you choose to believe in and what you wish to incorporate in your own life.

The seven main chakra centers are aligned along the spinal column. If there are disturbances on any level this will show in the chakra’s vitality level. Also, each of the seven main chakras is their own intelligence center. This means that each chakra is not only associated with our physical health, but also controls aspects connected to our emotional, mental and belief system.

To help balance a chakra-whether on an emotional, intellectual, physical or spiritual level–we need to bring in the chakra (color) vibration, which resonates at the same frequency.

By researching and staying connected to the chakra you can focus on (for example wearing these energetic bracelets) a planted intention and then healing can begin.

All this and more information including a chakra test can be found here: http://www.chakraenergy.com/test.html


It is important to know which chakra (energy centers) may be effecting your physical and emotional body. Energy blocks of our chakras could be creating physical discomfort or emotional baggage in our everyday life. Chakra healing can be extremely effective and lead to a greater awareness of your own personal body.

I have created a line of chakra jewelry to help in the awareness of our chakra centers and to act as a gentle reminder of the 'centers' of our body which may need more love and attention. 


Crown Chakra- All around us
Personal identification
Oneness with higher power/being
Spirituality
Intelligence


Third Eye Chakra- All around us
Intellect
Intuition & devotion
Peace & self realization
Pure state of mind


Throat Chakra- Ether
Communication in relationships
Trust & loyalty


Heart Chakra- Air
Respiration
Compassion
Unconditional love
Happiness
Self love


Solar Plexus Chakra- Fire
Seat of will power
Digestion
Self confidence and control
Manifesting goals


Sacral Chakra- Water
Creativity
Emotions
Intimacy
Reproduction
Sensual Drive


Root Chakra- Earth
Attachment to material and physical world
Survival
Base instincts
Sex Drive

If you are interested in having your very own contact me at taegansbuddhabeads@gmail.com and check out my facebookpage : http://www.facebook.com/BuddhaBeads (Press the like button if you do!) :) Much love to you beauties! Namaste.


Sunday 10 June 2012

Makeup for the Summer :)

For all those who need the low down on the basics of summer makeup, here it is!

First of all, your skin naturally glows in the summer - so chill it on the need to cover up! This means you don't need any highlighters and as much foundation and eye makeup.

These are the basics to the summer, natural & beautiful glow:


Left to right: bronzer, Laura Mercier tinted moisturizer, Jane Iredale concealer, Mascara, Sephora brow and eyelash brush, Benefit Eye Bright, Eyelash Curler.

For the summer you definitely need less foundation since your skin is more tanned - you want to let that shine through. I use a tinted moisturizer, which is great for extra moisture in dry Calgary weather, and it also has a lighter coverage. Laura Mercier is known to have one of the best on the market!


Foundation is First - remember that! It should be applied before anything else, so don't put on your concealer before foundation. Primer can be before foundation, as well as your face moisturizer, but nothing else.

After foundation is concealer. I use Jane Iredale concealer which I find is phenomenal for all day coverage! Apply concealer to any spots you need to 'conceal' ;) Jane Iredale is a great line actually for lighter makeup options - they have more natural products.

After concealer I use Benefit's Eye Bright which is probably my most favourite makeup product I've EVER bought, very seriously! You apply this to the dark circles under your eyes (FYI: you CANNOT use your concealer for this area! Your concealer should be the same colour as your skin, and hellooo the colour under your eyes is and should be lighter than the rest of your face, otherwise your eyes will look darker than normal and droppyy) so apply this pinky like concealer to that dark area under your eyes, blend smoothly in with your ring finger starting from your tear ducts and stroke down - you will be pleasantly surprised by your eye-opening results! I promise youuu!

Then comes bronzer. I use Physicians Formula bronzer - it comes with that cute and extremely convenient Kabuki brush (dense, dome shape brush - great for bronzers, mineral makeup etc.). Bronzer is a must for the summer, and should be applied in the crevices of our face right underneath the cheekbones to make them POP! Follow a 'W' shape from your ears, under your cheekbones, up around your nose and down towards the other side of your face. Also gently apply to your chin, temples and then sweep across your forehead.


After bronzer is blush :) I use Body Shop blush (NARS also has fantastic blushes, look for the one called Orgasm - sounds like it'll be good, right ;), they're famous for this blush shade!). Look in the mirror, give yourself a nice smile and apply to the plump cheekbones! With the blush residue left on your brush after, you can sweep some over your nose, chin and forehead - lightly, this will bring more colour to your face!

Following that I will curl my lashes (no need to buy an expensive one of these), try to get as close to the lash line as possible then crimp half way up your lashes for a more natural curl. There's a common idea that you should apply mascara before curling your lashes, but as simply as I can explain it, you really should not be doing this! Your lashes, because of the mascara, will stick to the curler and you can say goodbye to some lashes every time you do this. Sooo, best you don't ;)

Then comes Mascara. Honestly, there are hundreds of fabulous mascaras on the market, which can be fun! Try a few out! I will say more expensive ones will make for a better application and will last longer throughout the day - if you're gonna spend the big bucks, I recommend Lancome & Dior Show. But hey, it's a big pill to swallow, they can get pricy. Always apply starting in the inner corner and fan around your eye - use a zig zag motion to coat your lashes. My little tip that I always do is really fan out your last lashes at the outer corner - brush them up and out to get that beautiful wing effect that will make your lashes look luscious and your eyes bigger.


Lastly, this weird, dangerous looking tool I use to brush my eyebrows and comb out my eyelashes. I'll tell you why I think this tool is extremely underrated and should be a necessity for all makeup bags - I don't know about you, but I always need to brush out my eyebrows because they never fall in a normal, presentable way! Never! So I use this everyday. The other side is a lash comb which is great when your eyelashes just do not listen to you at all no matter how you move your mascara wand. This tool is more precise for that. But I find this tool to be most convenient to brush out my mascara after I've been wearing it all day so that I can brush out the dry mascara and reapply a fresh, new coat if I were to go out for the evening and don't want to wash my face to get all the mascara off and start all over again. I love it for that!! I got mine from Sephora and I highly recommend you do too! I've seen plastic ones, and you very seriously need this metal lash comb for it to work in the amazing way it can! I've had this tool for yeearss, so he's repaid himself several times over.

Hope you got some insight from this post! Would love to hear what you think, and if you would like me to touch on anything else :)

Stay beautiful,

Buddha Babes


Wednesday 6 June 2012

Yoga for Lower Back Pain


We all have, at one point of our life, suffered from some kind of lower back pain or discomfort. If this is you or if you know someone with this issue pass on this short yoga routine that you/they can practise daily and mindfully to help ease the pain. 


Begin in puppy stretch by lowering your chest to your mat as you pull your hips towards your heels. This can be a very intense stretch for the shoulders so please be mindful and gentle while going further.


Slide your upper body across and up the matt. Straighten your arms, open your chest, and slowly roll your shoulders back arriving into upward dog. 

Lift your hips up towards the sky, pull your chest towards your thighs as you uncurl your toes and straighten those legs. Don't forget to breatheee! :)


Mindfully walk your feet up towards your finger tips, arriving to the front of your matt. Allow yourself to take a few extra minutes here to receive all the benefits this pose has to offer. Feel free to bend your knees if this is too intense on the hamstrings.


Bend both of your knees, lift your left foot off the matt and send it directly behind you. Drop only the ball of your foot onto the matt as you straighten your back leg, maintaining a 90 degree angle with your front thigh and calf.


From here transition into crescent lunge by releasing your back knee onto the matt, placing your hands onto your knee, uncurling your toes and slowly easing into the stretch by sending your hips forward and down. If you would like to intensify the stretch lift your arms above your head, spread your fingers wide and breatheee. (Image below for reference) 


When you feel you have received what you can from this pose drop your hands onto the matt, curl the back toes, straighten the back leg to arrive into low lunge again. Slightly bend your back knee as you step it up to meet the right foot. Straighten your legs the best you can and bow down onto your legs. Release your head and neck here in forward fold. 


Bend both of your knees, lift your right foot off the matt and send it directly behind you. Drop only the ball of your foot onto the matt as you straighten your back leg, maintaining a 90 degree angle with your front thigh and calf.


From here transition into crescent lunge by releasing your back knee onto the matt, uncurling your toes and slowly easing into the stretch by sending your hips forward and down.


This here can get tricky so be patient with this transition. Place your hands onto the matt. Use the strength of your arms to lift your left foot up and slowly bend your knee out to the left edge of your matt as you lower the side of your calf and foot down. You may need to make two adjustments: walk the back foot back behind you to even out your hips. Also, if it is available to you, lift your left foot and walk it up so that your calf is almost parallel to the front of your matt. From this place allow both of your hands so drop to the side of your body and work on sending your hips down but making sure not to lean to much to one side.


Use the strength of your arms to lift your left leg off the matt and send it behind you the best you can. From here position your self into table top position. Knees hip with apart, hips directly over knees, shoulders over wrists, and breathee.

From here we are going to transition to the opposite side of pigeon pose by simply reaching your right knee towards your right wrist, swing the side of your right foot towards your left wrist (again making that line across your matt with your calf). Surrender fully into the pose by sliding your left foot back behind you. Square off those hips and breathe as you focus on surrendering into the stretch.


Shift your weight into your right hip, swing your left leg around (the best you can) over top of your right leg and place your left foot down onto the matt and along side your left thigh. From here pull your right foot next to your left hip, hug your left knee with the opposite arm, and straighten your left arm into the matt and up against your back to assist in finding space in your space. Inhale work on straightening the spine, exhale twist deeper.


Switching to the opposite by pulling your left foot alongside your right hip, swing the right foot up placing it onto the matt aligned next to your left thigh. Hugging your knee into your chest as you work on straightening and twisting your torso.


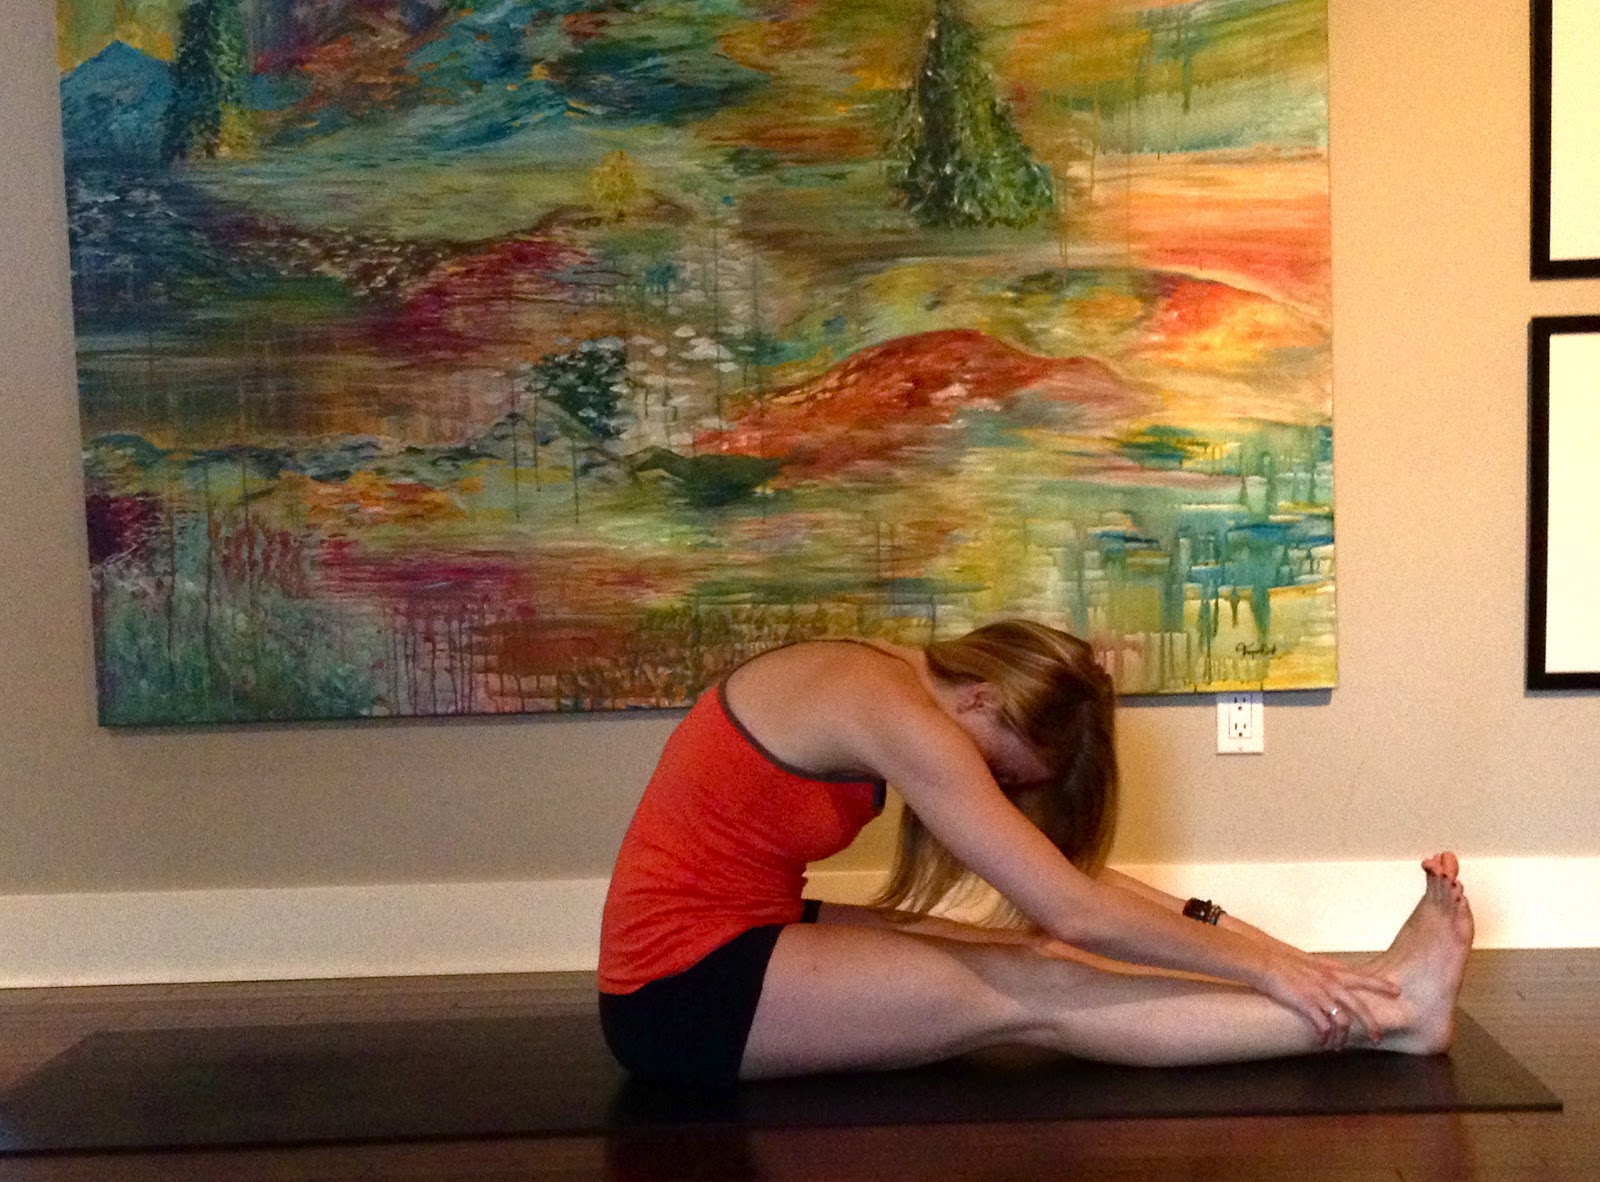
Release both feet out in front of you, bend your toes back, place your arms where ever it is available to you (knees, thighs, calves, or ankles). Begin with a straight spine as you bow your chest towards your legs.


Once you have gone as far as you can, give in the rest of your body by allowing your back to gently curl forward, let go of your neck and head. Take at least ten breaths here before you lower your back onto the matt to finish your practise.

I rely heavily on my good looking stick people to help me remember certain sequences or routines for teaching and my own personal practise. If this helps you as well feel free to print this off as a reminder of what positions are next if you have enough yoga experience under your belt and understand how to get into each posture.

I hope this frees you from any discomfort you may be feeling in your lower back if even for a moment. Try your best to practise this routine every morning right after waking up for a week and notice the footprint yoga can leave in your body! Any further questions, please feel free to ask. Much love & Namaste Taegan. :)